Working With GraphQL for Mobile App Development using Flutter - Part 2
I continued from Part 1 of our series in working with GraphQL for mobile App Development, please check it out if you missed it.
To begin with GraphQL for flutter, here are the steps to take-
1. First get the plugin for graphql flutter from the pub.dev its called graphql_flutter. or better still copy this graphql_flutter: ^5.0.0-nullsafety.2 and paste in your pubspec yaml file. Make sure you are pasting this in your dependencies path.
here are the basic dependencies to get started
hive: 2.0.4
hive_flutter: ^1.0.0
path_provider: ^2.0.1in your dev dependencies add this
hive_generator: ^1.1.0
build_runner: ^2.0.1
Hive is an In-Memory management library which provides the technology of handling in memory management for you during your app development. please check more about hive for more details.
path provider is a library which helps to get the current path or directory so that can either use it as an argument for some other process or just any use case depending on what you are working on. here I need it and you will see where I will be passing the current directory path.
in the dev dependencies, I included hive generator and build runner.
hive generator will generate the typings for our hive box when I specify the annotations during setting up hive.
build runner is used to generate the hive box adapter. you will see how I set up hive and use build runner to generate adapter for it.
2. I set up the GraphQL configuration for the client or better still you can call the endpoint., Create a folder on your lib directory, call this folder network and then create a file called GQlConfig.dart
b. in your file, declare a class for the configuration like so:
const GQL_HAGGLEX_BASE_API =
    "your_graph_ql_base_endpoint";

class GraphQLConfiguration {
  static HttpLink httpLink = HttpLink(GQL_HAGGLEX_BASE_API);

  Future<GraphQLClient> gQLConfig() async {
    var box =
        await Hive.openBox<ResendVerificationModel>('resendverificationmodel');

    return GraphQLClient(
      link: httpLink,
      cache: GraphQLCache(store: HiveStore(box)),
    );
  }
}
I have created a Hive box known as ResendVerificationModel and I termed the key to our box resend
here is how you create the Hive
a. create a file in your network folder with the Hive name you want here I have used resend_verification_model.dart and enter like so:
import 'package:hive/hive.dart';

part 'resend_verification_model.g.dart';

@HiveType(typeId: 1)
class ResendVerificationModel {
  @HiveField(0)
  String email;
}
I have specified the part same name as my file name but suffixed it with .g.dart. though this will initially mark as an error when you run flutter packages pub run build_runner build, it will generate the adapter for your Hive and then the error will go away.
also, note that I placed typeId as 1, this is the first Hive adapter I am creating so it is like saying version 1 for the type. if you don't enter a typeId, it will give you an error.
3. Initialize Hive in your main or the entry to your application
In other to initialize Hive, before your runApp() but within your main entry for your app, do this:
Future<void> main() async {
  WidgetsFlutterBinding.ensureInitialized();

  Directory appDocDir = await getApplicationDocumentsDirectory();
  String appDocPath = appDocDir.path;

  Hive.init(appDocPath);

  Hive.registerAdapter(ResendVerificationModelAdapter());
  runApp(MyApp());
}
you notice I have added WidgetsFlutterBinding.ensureInitialized(). this will make sure that your widgets or MyApp don't run immediately while it is trying to executing some task asynchronously and awaiting some result which needs to be passed down your app because your app needs it, for example, the Hive adapter needs to be initialized and set up within your application directory and passed down the widget tree.
the path provider library we added gave us access to the getApplicationDocumentDirectory and allowed us to access the current path now we pass it as an argument to the Hive init method. and registered our Adapter.
the Adapter suffix becomes available after we had ran the build runner which generated it.
4. Setting up your Query
a. Create queries. dart file in your network directory and here is how we set up a query for one of the Query in the graphql playground
class Queries {
  String resendVerificationCode() {
    return """
    query resendVerificationCode(\$data: EmailInput){
          resendVerificationCode(data: \$data)
    }
    """;
  }
}
every query or mutation is sent as a string and resolved by graphql to process and sent the response back, hence we set the return type to be a string.
you notice the query prepared here Is the same as with Part 1 except that this time, the first query name is a way to prepare any argument we might be passing in the query, then we repeat the name again and reference the value for the key which we actually need to send to our API for processing.
we use \$ to denote the value and I am entering the type EmailInput as the value, during runtime, I have to provide the key-value pair for my EmailInput type. Hence, here is how I set up the model for the key-value pair which will represent the type during runtime
class EmailInput {
  final String email;

  EmailInput({this.email});

  Map<String, dynamic> toJson() {
    return {
      'email': email,
    };
  }
}
because it is a JSON map of key email and the value is a string, I set up a toJson() method to encode it when I enter the value every data sent via network or transferred are serialized in a machine-readable way for the service to understand.
b. checking that this works.
on your main file, initialize instances for your GraphQLConfig and Query classes
then write code as so
Future resendVerificationCode() async {
  GraphQLClient graphQLClient = await graphQLConfiguration.gQLConfig();

  QueryResult queryResult = await graphQLClient.query(QueryOptions(
      document: gql(
          queries.resendVerificationCode()),
      variables: {
        'data': EmailInput(email: "kinikiniwwa@gmail.com")
            .toJson()
      }));

  print(EmailVerificationResponse.fromJson(queryResult.data)
      .resendVerificationCode);
}
our instances are graphQLConfiguration and queries
so the graphQLConfiguration triggers the gQLConfig method to get initialized and the instance is used to query, passing in QueryOptions such as the
1. document
2. variables
for the document, we use the queries instance to trigger our query string using its method wrapper called resendVerificationCode
and because our argument for the query string requires a value, we enter the value for the variable data. by using the model EmailInput and entering the key value in the constructor.
lastly, I use .toJson() to encode it.
printing the queryResult.data will give us a JSON response which we can then use .fromJson to access
Note: print the response using queryResult.data first so you can see what you are expecting, which can help you design a response model class.
class EmailVerificationResponse {
  final bool emailVerificationSent;

  EmailVerificationResponse({this.emailVerificationSent});

  EmailVerificationResponse.fromJson(Map<String, dynamic> json)
      : emailVerificationSent = json['emailVerificationSent'];
from the above response mode, we are expecting a JSON whose key will likely be email verification sent and the value a true or false hence printing EmailVerificationResponse.fromJson(queryResult.data) will map this to our class and allow us to access it. This is known as the deserialization of network responses for code specific platform access.
Also, you can create a directory for request models and response models so as to help organize your folders.
5. Setting Up Mutation
Mutations have been discussed in part 1, here is the mutation for registration of a user, you can create mutations. dart file as you created queries.dart file in your network folder
class Mutations {
String registerUser() {
return """
mutation register(\$data: CreateUserInput){
register(data: \$data)
{
user
{
emailVerified
phonenumber
referralCode
username
kycStatus
}
token
}
}
""";
}
}
like we discussed whether mutations or queries, are returned as String and passed to the query options document for our graphql engine to process.
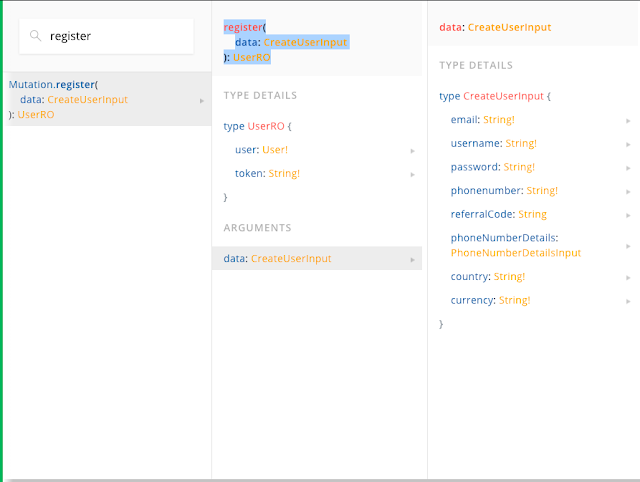
the method is registerUser and just like on queries we specified the type- you will recall from part 1, that we had the same type CreateUserInput as the value for the data key passed as an argument to our register mutation.
in other to specify a return type we use the curly braces to wrap the keys for the type we expect or want from the API but if the key has a type as its value, we further use curly braces to specify the values for such type.
from above, we specified user and token as the values we expect but the user has a type of UserRO, so we further break down using curly braces, specifying the keys for such type.
checking that it works
just like we checked for queries, we also need to set up an instance for our Mutations class. then we have our code like so:
Future registerUser() async {
  GraphQLClient graphQLClient = await graphQLConfiguration.gQLConfig();

  QueryResult queryResult = await graphQLClient.mutate(MutationOptions(
      document: gql(mutations.registerUser(RegisterUser())),
      variables: {
        'data': RegisterUser(
                email: "ofatroi9090@gmail.com",
                username: "ofatrib",
                password: "abc123000.",
                phonenumber: "080565***14",
                country: "Nigeria",
                currency: "NGN")
            .toJson()
      }));

  print(queryResult.data);
}
here we noticed mutations is our instance which you set up like this in your state class.
graphQL client also has a method called mutate which has arguments specified using MutationOptions class and we enter the values for the keys; documents, and variables like we had done in queries.
documents using the mutations instance to trigger the registerUser method and the value of the variable set up using the class model for our request, passing in the needed request parameters while encoding using .json
in other to test out any other methods, just call them in your initState like so
@override
void initState() {
  super.initState();
  //resendVerificationCode();
  //getUser();
  //registerUser();
  loginUser();
}
and the print statement will return the JSON so you can further design the type of response class to map to using .fromJson.
Here comes the end of this series.
I hope to make it through the interview process, I will keep you updated with my activities during the Interview process.
PS- My interview is about consuming HaggleX GraphQL API and designing some screens for some user roles.
Comments
Post a Comment